[This post is part of The Accidental Photo Adventure]
Plan B
We got a good night’s sleep and started the day late. Checking the news, it was obvious the parks closure wasn’t ending soon. We ate breakfast at a local pancake house for the second day in a row, enjoying a mix of carbs and protein to fuel the day. A bit of work was done on photo editing and we debated a list of things to photograph that would let us salvage our trip and the time off. Fortunately, we hadn’t booked hotels further along our route – it looked like we were not only re-routing, but cutting a week off our itinerary too.
We toyed with the idea of continuing up to Wyoming anyway – surely the Tetons could be photographed from outside the park. And Yellowstone had roads running through it, so perhaps it wouldn’t be completely closed. And the hotel had plenty of vacancy last we checked.
Those ideas got cut short by a tropical storm that had hit the Pacific Northwest and was working its way across the central US, dumping heavy snow right where we planned to go, and spinning up tornadoes along our return path. Plus, the hotel was now nearly full from campers who’d been kicked out of the parks. We took the hint and scratched the northern two-thirds of our itinerary permanently off the list.
Plus, we’d already paid for the night, so what could we do as an out-and-back day trip? The answer: Monument Valley. About 3 hours’ drive to the South and West from Moab, Monument Valley isn’t a national park – it’s on the Navajo indian reservation. It was on our itinerary originally, en route from Zion National Park to Canyonlands, but we’d removed it because it added like 6 hours of driving; under the circumstances, the extra drive wasn’t a big deal now. We decided to set out, with a goal of shooting at sunset.
Mexican Hat Rock
The road from Moab to Monument Valley is lightly traveled, so cresting a hill we couldn’t help but notice several cars pulled off the road. We’d stumbled upon a nondescript but interesting rock formation known as Mexican Hat Rock – no fanfare, just a street sign.
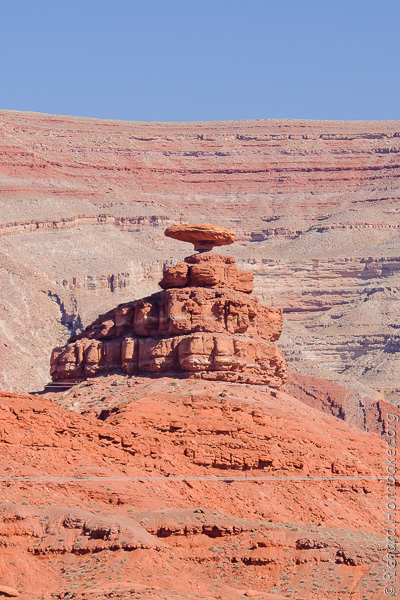
This image demonstrates something I found pretty frustrating for the length of our trip – power lines. They mar beautiful landscapes, and Photoshop isn’t much help. Quite a bit of retouching with the famed Content-Aware Fill just couldn’t yield normal-looking results; in the end, I gave up and left them as-is. Before taking this shot, I actually hiked up and down the road to find a better angle to eliminate the power lines. Had I known they couldn’t be easily removed in Photoshop, I would have hiked in past the power lines and accepted a different composition.
Mind you, I don’t have an issue with the need for power to cross these beautiful landscapes, but it seems that the paths they’ve chosen are frequently poor. Lines cut across amazing vistas when they could have been routed slightly differently and preserved a fantastic view.
Editing this photo, I was reminded of an idea to eliminate these kinds of foreground objects – shoot from two slightly different vantage points, so the foreground objects fall in different spots of the composition. “Abusing” panorama software to align the two images, I’m thinking the content from one could then be easily cloned onto the other to paint over foreground objects, making them disappear. I didn’t shoot material to try that technique here, but it’s on my to-do list now.
Monument Valley
We arrived at Monument Valley in mid-afternoon, about 3 hours before sunset. The first thing to note is that the valley is full of Goliath-sized monuments, not just the iconic pair you see most often. Given the timing, there was a choice to be made – cruise around and look for interesting angles to shoot, or stake out a vantage point and wait for the sunset lighting to cast dramatic shadows across the valley.
There’s a dirt road circling the main monuments, so a lot of angles are possible; however, we were driving a low-clearance car that didn’t exactly fit with the notion of “off-road”. We opted to pay our admission and setup camp at the visitor’s center, which incidentally has an excellent display of history on the Navajo’s critical role as code-talkers for the US military during World War II.
Yes, instead of doing something unique, I wanted to shoot a cliché photo – and from the visitor’s center, no less. It sounds pretty lame, but the visitor’s center offered an excellent vantage point of the two extremely-popular “mittens”. I had an idea of the shot I wanted, which would be in the last minutes of sunset as the shadows grew long. This also meant that I was only getting one photo out of the entire day’s trip, so I was going to invest the effort to get it.
Three hours early, we setup our cameras to stake out our spots, meanwhile drawing curious looks and questions from other tourists because of our camera rigs – most notably, the 6×7″ graduated ND filters fastened to the front. A drawback to setting up so early: someone’s got to watch your gear when you need to run to the bathroom. That’s when it’s nice to have a shooting buddy.

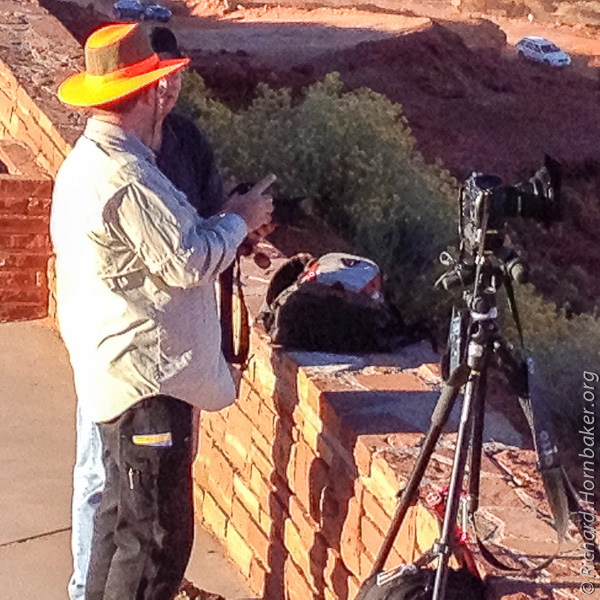
You’ll notice my camera bag is clipped to the bottom of my tripod – this serves two purposes: first, it adds stability and lowers the center of gravity, reducing vibration and the chance of knocking the tripod off a cliff; second, in high-traffic areas, it straps everything together, making it extremely unwieldy if someone had ideas of stealing something.
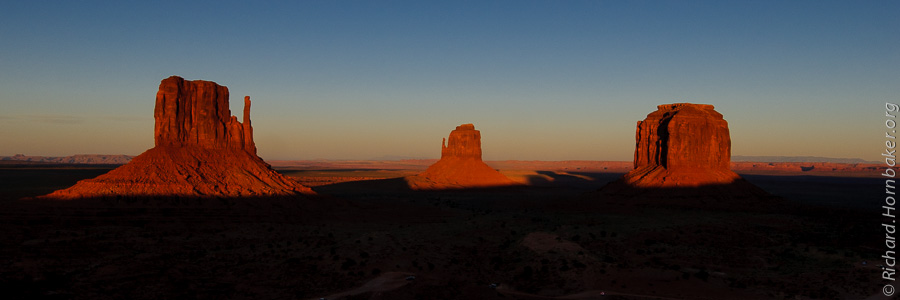
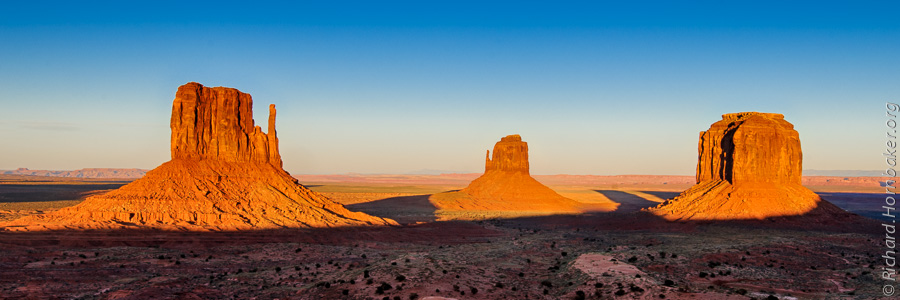
These first two shots are for comparison to show how the color of the light shifts to become “warmer” as the sun reaches the horizon – this is the so-called Golden Hour, and it’s a good reason to bring a tripod. To benefit from this effect, you wouldn’t want to shoot a color calibration card in this light – that’d negate the orange color shift. Instead, you’d shoot a color reference when the sun was high in the sky, and use the same value for all the shots (these are both set to 5500K). Both of these shots have roughly the same exposure, but you can see how the color is very different in the shot just before sunset; the other was taken 90 minutes earlier.

I took a different approach for this shoot and captured a *lot* of images. I expected to post-process it in HDR, and possibly even composite images from different times during the sunset. I set the camera to bracket 9 shots at 1/3-stop intervals, so I’d be able to draw out the shadow detail without it looking extreme. Primary exposure was slightly under-exposed for the directly-lit monuments, with bracketing ranging from 1-1/3 stops brighter to 1-1/3 stops darker.
There weren’t clouds or other objects being overexposed, and I used a 2-stop (0.6) graduated neutral-density filter to darken the sky to about the same exposure as the subject. So, I didn’t bracket to recover highlights, I did it to add detail to the shadows in the foreground. As the lighting changed, I adjusted the shutter speed to maintain about the same exposure on the monuments.
Adding to the HDR, I used an interval timer to fire a bracketed burst every 20 minutes at first, progressively shortening it to every 15 seconds at the end of sunset when things change quickly – and, yes, I ended up with a ton of shots. To make this work, the camera is set for continuous high-speed shutter – on a Nikon, if you hold the shutter release to fire continuously during bracket mode, the camera will automatically stop shooting when the last shot of the bracket has been taken. Using this behavior, the interval timer was set to do a bulb exposure (i.e., hold the shutter release down) for several seconds. I also use this technique without the timer, because it’s much easier than remembering how many shots of a bracket have been fired.
The final image was processed first in Lightroom as a bracket of 9 shots from 10 minutes before sunset. Those shots were then merged to HDR (and tweaked some more) using custom settings in Nik’s HDR Efex Pro 2. The final image was auto-imported back into Lightroom where a few more adjustments and cropping were done. I’m pretty pleased with the end result, which doesn’t look artificially HDR to me, but conveys a wide range of lighting.
The drive back to Moab was uneventful, but very dark and solitary with no other cars for miles at a time. In the middle of nowhere, we stopped at an A&W restaurant and bowling alley (!) at a gas stop. They’d just closed for the night, so we bought up the only thing they had left: some very greasy fried chicken that’d been under a heat lamp most of the night. Opinions were mixed on whether we would have been better off to go hungry for another hour.
.
Intro | Day 1: Getting Started, Zion | Day 2: Zion
Day 3: Red Canyon, Bryce Canyon | Day 4: Capitol Reef, Canyonlands
Day 5: Dead Horse Point | Day 6: Monument Valley | Day 7: Grand Mesa
Day 8: McClure Pass, Aspen, Garden of the Gods | Day 9: Wolf Creek Pass
Day 10: Durango & Silverton Railroad, Albuquerque Balloon Festival
Day 11: Pre-dawn Balloon Launch, The End | Trip Prep | The Gear
FotoMomenti – My Comrade’s Portfolio
.


