Archive for Panorama

Day 7 – Grand Mesa

Posted in Photography, Travel with tags , , , , , on 07 November 2013 by Richard Hornbaker

[This post is part of The Accidental Photo Adventure]

So far this trip we had a trend of grand landscapes – mountain ranges, canyons, etc.  Now, we were shifting gears, and the adventure really began.  We were venturing “off the map” – away from designated landmarks and toward discoveries of our own.

Mapping the Course

We decided to head East into Colorado, and for the first time we didn’t really have a destination in mind.  Instead, we had a theme – fall foliage.  On an idea, I’d found an article in one of the Colorado papers from a couple weeks prior. It listed a bunch of places to see fall colors, and estimated the leaves would be turning right about now.  It seemed our timing was accidentally perfect.

Taking pointers from the article, I mapped out a dozen sites in Google Maps and started to piece together a route from Moab.  A bunch of sites got cut from our list because they were too far out of the way, or only accessible via long dirt roads.  But even the shortened list was a pretty good selection.

Grand Junction AAA

On the first leg, we headed in the general direction of Northwest Colorado, ending up in Grand Junction where we hit the AAA office for some maps and local advice.  It was there we transferred the Google map to a good old fashioned paper map using a highlighter – paper being much more reliable than mobile Internet access in the mountains.  (Something that many folks don’t realize: if you’re a AAA member, you can get free maps and guidebooks at any branch.)

The storm that’s crossing the central US is starting to roll in, but so far we’re still ahead of it by about a day.  We have no idea where we’ll stop for the night, but we’re trying to avoid ending the day in any of the many ski resort towns – there’s no sense in over-paying for our room.

Our course would take us diagonally to the Southeast toward the middle of the state, passing first through Grand Mesa, the connecting with a highway that’d take us back Northeast in a zig-zag pattern across the state.

Grand Mesa

Heading toward Grand Mesa we had our first near-miss with wildlife. OK, well it wasn’t really a near-miss… we had plenty of room to brake, but suddenly an 8-point buck was sauntering across the highway right in front of us!  Big guy, too.  We’d been debating for days whether to get a GoPro Hero3 video camera for the dashboard – at this point, we regretted not having it.

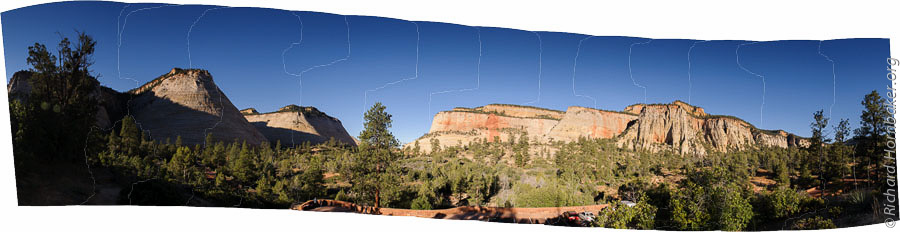
As we got to Grand Mesa, a dark storm was rolling over the peaks.  It added a great dramatic element to the photos, but it also made the light challenging.

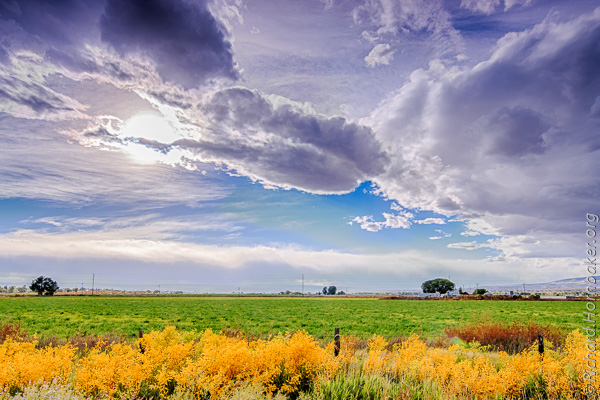
“Did you see that?” “Yeah, we gotta go back and shoot that!” We were on the hunt, and it totally changed the dynamic of our trip. Instead of having the next destination programmed into our GPS, we were on high alert the whole time, scouting for photo ops at 60 miles per hour.  This is one such opportunistic shot – a small valley running parallel to the highway:

DDD_3364_HDR

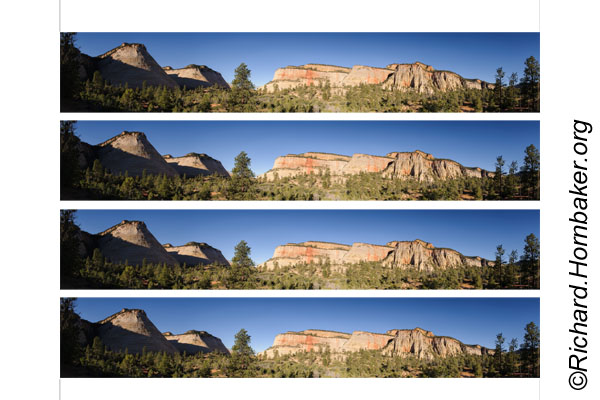
The above image is an HDR comprised of 5 shots at 1/3-stop increments. It’s actually very close to the primary frame in the set – partly because my tastes in HDR are very conservative, but also because I applied strong graduated neutral-density (GND) filters to darken the sky when the images were shot.  As the trip wore on, I came to prefer a soft-edge GND between 3 and 5 stops (0.9 to 1.5), which was achieved by using an 0.9 GND and adding a second 0.3 or 0.6 GND.

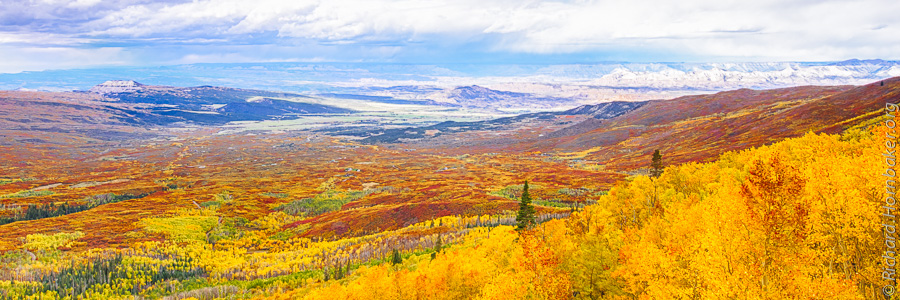
The clouds offered even more dramatic skies as we continued across Grand Mesa.  Driving up one side of the ridge, the storm was coming toward us:

DDD_3451_HDR

As I work more with Nik’s HDR Efex Pro 2, I’m continuing to refine my custom presets.  In the image above, I moved my post-HDR tone-curve tweaks from Lightroom into an HDR preset, which both reduced the number of steps in my workflow and improved my consistency.  I really, really wish I’d shot this image as a stitched panorama to yield super high resolution.  But as it was, we barely got to make our shots before the rain came down.

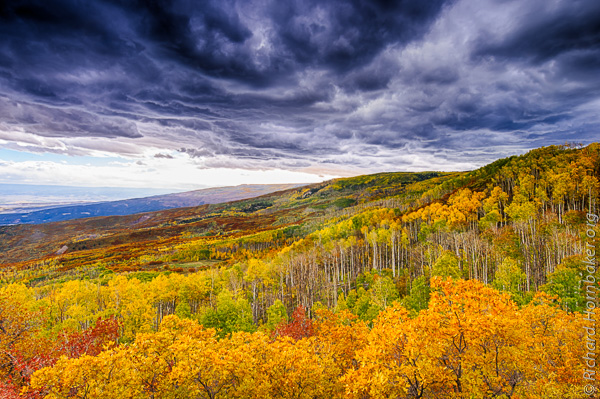
We continued our trek across Grand Mesa, driving through the storm and coming out the other side of the mesa. We were looking at the back-end of the storm, and the scene was completely different but equally spectacular:

DDD_3487_HDR

And yet another very colorful image as we headed back toward the storm.  I’m thinking this one is destined for a canvas print, and may be my best shot of the trip:

DDD_3505_HDR

It’s said that “luck is preparation meeting opportunity”, and this is a perfect example.  As we were nearing a junction in the road, my colleague pulled over to take a phone call.  I literally shot this next image handheld out the car window, using the doorframe as my stabilizer.  Of course, I did still have GND filters on the front of my lens.

DDD_3524_HDR

All this goes to prove that good weather is boring, and foul weather makes for great images – you just have to endure it.

Change of Plans

Well, it’s not as if a change of plans was unexpected.  We really had just a rough idea what we wanted to do, and we were improvising one step at a time.

The idea for today was to make it back up to the top of the state, near the main freeway, before heading southeast through Aspen the next day.  However, the day got long and we found ourselves about halfway along that route, in the town of Paonia.

McClure Pass was next on our list and just up the road, but there wasn’t going to be much light left. We checked rates and found it cost half as much to stay where we were for the night. So, we’d spend the next day at McClure Pass, and then head through Aspen. The only challenge: the storm was going to hit overnight, so the weather might be pretty bleak, and the foliage might be hidden beneath snow.

After Aspen, we’d try to make it to Colorado Springs by nightfall.  There we’d find the Garden of the Gods park. And maybe some train scenery. Perhaps even a drive to the top of Pike’s Peak.

Fortunately, the only motel in the area was not only a reasonable price, but pleasant too.  It’s a family operation, run by a charming little Polish lady.  We’d been fortunate to land in their off-season – after July, but before the ski resorts opened.

ÙVëÁ—Ž	qžEPú?ç…ªj6ºziúŒ3ÝʑFf‡Š$¨Z´à%Óÿ_ìþÖWá¦Õ¤~aÛjš…¼6ö“Çkqwm§^lë+XšLΣxPÞ›7Ûãû9Làb8¢XÊú0ùoÞ̏6?%ˆû¡þÜÍÑÈÈy®[àù¢eÔË+™ÔâڙÔdíR¸O*’0©K%ڊò¦6©UÅüëPÝ{d–ou=+¾:+öSñtÅUílp ¥·¼YMM}°…ÿÐôä:tQšõ>ùZ){§zŽ8/mðÚ)u®š¨£–ø-i‘ª¨l1M>lüüüϺ¿Õ¿Ãº¢’‘˜ï}*¨–~d23þÚ-§ÃË1sdèò-þëCó%´¢÷êW6¤-ÀOV’(æ«Äu¯Ùþ n’P®£wªÝËy9&vrÎìjIcZ’ÖÊ/{*œùsÌz¾‰t—VwRA3•ŽPŽq† ÄÓzrQá;'›êÿ)ù·Hóu —M—”‘¢5ÔnÝTý5͞< †)¥Æ™9v +N‡¦YÄDž"¾°¾º xšd¸ƒÇô=<^Úkv×P‰á“Puš&4¯¡#§¸Ì.uÿÊlÞpw8vŒºòeëêºf­±Ë]Rkû¤z…x§„ÛqRøÒ!ÿ.ÚccåmRÃ[‚}>D²°k›™õ;hÉ0N’ÔÆR¯£?2­+¡UoísÀpÙÝmæ~o˜[~fù†›sŠÌÿÉ,8#RŸèÅ/êkËq±ê–ü@¦þ8)! är/ÂÔ¯l‰dŅkôŒ¥K҄žEom4…¹Ž”§¶PBAy/	[áØƒ|°% n¦"Š§Û ¡Fc{¾›‡ˆ&ŸÿÑõFV­S¸:b¬ó“Ώ•<“6¥¦´izòÇoH9êV¤/vâ23—µ|]uï˜*²`d¸w #QcÊýšý%jÔN´J¤3¨ÿ(¿†VGTº5ºŠUg‘BÊQÖ¸’W«þGùòÓËþmý¾­az䟄AG?ꑾD²/«ã’¡Ic!£‘C£ê æu±CZÂà†PF6¬/I‚—òÂxÔ®5+B#A§z•ÌîζxŸ™ÿ52´»ívÖ»[‹} é-§”Û*3vTjiVJ6ùxÅÆÐvüÐÕ®ï¯5.Çh4›hì¾³$¬Œ×W1—p†üYYOú™‚=C/C‘z?œ5›)þ^麾©o¯®Þ*}R±­´eäÕ<Ò5ŠÿdÿR1FRå³!’C«×`ü×òîœÚìö¾Õ¸»›KŒDÑÿ»!¯ÁüÙ1qp×6øÊF<Wô²O+K}­yGD×ü´þ—˜'ÔSO¹’@+9äeâA ÅüÿÍÅ~,ÁIŒµ˜¢šÙù›ó÷ó…üŸ™…½«˜µioFq«ºSìs4û_g.Œ!2'BãôɦDÄRs¯yËó+Eü­½Ö5+mæ-/RkI[ÐOFxŒŠŠê ýš5Q×2lµ£­u¯<jž[Óît?1ÇuæIl`Ô®´w··!¢”€ÁYBúGsÙø°UùÉç?8ù_^ÐaÒ5?J iý) xbq+F•F+ËR¿J½nÒa¶Ž)fk‰Qçp¡œøWî ‡‡yËO’÷ó7Ìv1Ãe¸ð1exÍN_yG¢?yyëñ9ùeÜn7 "=Wy)Nøñ¯ctäÕÛ¶@ɗ £[¦ÊúiX[R?ˆÐ˜™€±4a1'pBqã^æòÕº¡*¿Ž¯A®†V¼©N•ÃƼ*si7Mˆ¦<iáÿÒõFA]]оMÿœ„üȓ_×I³jéT†8¨)ê ¬’òa?æìÄË;4¯k…YJõ,@ß#­òá'3CØ} …ËêL±š…*HîA4þ9"É]®VŽ•2(ûS'Ë:Ë*½´JºÄ€dXÀSßi©ñæV¼[2!í!ª9Å…è~’Ï­Í3ð‰5+Ǒ`„~åʲ6ŽOšÒ×Y›óEÑ%dÕÖtI2…œÛN×+O°½ó#Š©1×ÒÓò~;_Bs«ë·ÖÄ+„‹[XÞÌBÑxZ€äø·cOMüÇЯüñùi¢ßù~–} Óêd’HÖ5‰ø«<ѐ|?´¹F9ԍ²!	æ¯Í;Ï3y:M/(ê æ+˜E±/áv$’2=ÇÙVþ^#í–gù?ù_'—|›®¼ÒÝBëëWV	!&ÀG…Ù™U*Ûý¯‡0µ“1ÈǓÓd–/ùÈ#æ(t}F=¢‘N,gU õq×û,ÍÇÀ95ȓ¹g?óbîóÈRé6w7·÷“BÑGm’€±H¬åÙTÛ§/µ–™!†éwòyk˖2ùSʚ¤~p¸Óíôûùþ£"[¡VRóHi,µ¯ÿ‚ÈñDþ}ZëZ·™¼²4Í&þøhòú×ÒÁm#F¼N=8»qFû8L‚²3~cù®ö{ /Êþ]Õ`k»¨ïU»´hÒ‹êV­OÚo…W-$>b—ó?Ì¡A4‚ǧüb9O¨³Éô‹vÿXž@ª„ƒÔ头&°i’²Ð©¨êO†D͐Š*-˜ï3d"ˆý^;÷88™p¯‡OŠRj¤Ü×Zi¯t¥Ñ¦Õà™.,`äia!ƒÈ;푴¾vœgŸQ±¹‘£²ži=-Ô:K·§UAö2ƒ”Û^ë¢ßì麕°ýÕÌaÀð=}3 JÒžÙ‡Q¿a…/ÿÓõFA]Š¥¾eÕ?Ey{RÔ¨I³¶–e»”BGJž¸	WÁ:¥üÓI5ÄÇԒWgbMIbjIúN`ÙT³÷)2³RE4ñ‘ü2ÙrRÜß`!¨f;Ÿòr°oªDe#? w%¿ J£4•€§A·ñÊåÍ4ݵÂÂäˆè­]©µHþ˜Ú¯-ë÷-õ–£¤Ím2LžSÓé¦ù*Vo¶´ÍjÓRÓmuf ÜK4dŠ8­>Ž™ž ¼ëX›óDÔïEivZŽŸwu5Ô3´î’Y¹t¦Ü|k‚@ÀGV?©þr~ciúƒhóùzÍnŸ{— c²‚úÊAÊüwgŶoÍÏ?º:þƒ³N@®	ë’ð‚8ÂL?7üé¡Ù"I¥Ûz-#ð¬¬íÉÉs¸9ˆÌqñ Gÿ9çöt˜	íñIÓƒ}ìÎŽ¡çߟæXÞ-8u`&mÆÃ¡È8_Î	ýOæÞy~ÜSj•˜o÷àðQ

But even more surprising was the Italian restaurant where we had dinner in Paonia.  At the rear of the very unassuming Flying Fork Bakery is a garden, through which we entered the Flying Fork Cafe.  This place truly is a gem – it could easily have been a high-end boutique restaurant in a major city, but instead it was hidden away in this little town deep in Colorado. My colleague is a bit of a foodie and he travels regularly to Italy, and he was pretty darned impressed by the place.  Needless to say, it’s highly recommended.

IMG_1320

.

Intro | Day 1: Getting Started, Zion | Day 2: Zion
Day 3: Red Canyon, Bryce Canyon | Day 4: Capitol Reef, Canyonlands
Day 5: Dead Horse Point | Day 6: Monument Valley | Day 7: Grand Mesa
Day 8: McClure Pass, Aspen, Garden of the Gods | Day 9: Wolf Creek Pass
Day 10: Durango & Silverton Railroad, Albuquerque Balloon Festival
Day 11: Pre-dawn Balloon Launch, The End | Trip Prep | The Gear
FotoMomenti – My Comrade’s Portfolio

.

Advertisement

Day 5 – Dead Horse Point

Posted in Photography, Travel with tags , , , , on 17 October 2013 by Richard Hornbaker

[This post is part of The Accidental Photo Adventure]

Arches National Park

“Welcome to your national park.  Now go home.”

Yep, it happened.  It’s October 1, 2013, and the new US federal budget didn’t get approved.  In the most visible immediate impact, all national parks were closed.  Apparently roads, overlooks, and campgrounds stop working without funding.

This was the scene at the entrance to Arches National Park in Southeastern Utah, with park rangers barricading the entrance and turning away traffic:

DDD_2864

I’ll spare you a political rant, but I’ve been incredibly frustrated by the lack of common sense being applied – this almost seems designed to make the public irate.  In many cases, more effort was being spent to deny access than just to allow it to continue.  E.g., barricading and patrolling open-air monuments and memorials.  Locking rest stop toilets that are literally nothing more than a toilet seat over a large hole in the ground.  Among the petty actions, the National Park Service even took down its website, claiming it “wasn’t being maintained”.

Plan B

Anyway… we decided to hang out in the motel for the morning in case the politicians came to an agreement and the disruption was short-lived.  As the day wore on, it became evident that we needed to make other plans.  And so did other folks – by mid-morning, the area was already losing massive amounts of business; one hotel had 3 tour buses cancel immediately, costing 50% of their bookings.

We took the opposite approach and extended our stay by an extra night, holding onto hope that sanity would prevail and we could resume our itinerary.  Meanwhile, we considered other activities for the next couple days.

Dead Horse Point State Park

As luck would have it, we’d passed a turnoff on the road to Canyonlands.  It was for one of Utah’s state-run parks, and it had an entirely different vista of the canyons below – essentially, it overlooked the upper section.

And, boy, were they busy.  By some accounts, they had 10 times their normal volume of visitors.  I’m sure this was greatly influenced by their proximity to both the town of Moab and two major national parks.

DDD_2904-Pano

DDD_2918

.

Intro | Day 1: Getting Started, Zion | Day 2: Zion
Day 3: Red Canyon, Bryce Canyon | Day 4: Capitol Reef, Canyonlands
Day 5: Dead Horse Point | Day 6: Monument ValleyDay 7: Grand Mesa
Day 8: McClure Pass, Aspen, Garden of the Gods | Day 9: Wolf Creek Pass
Day 10: Durango & Silverton Railroad, Albuquerque Balloon Festival
Day 11: Pre-dawn Balloon Launch, The End | Trip Prep | The Gear
FotoMomenti – My Comrade’s Portfolio

.

Day 4 – Capitol Reef, Canyonlands

Posted in Photography, Travel with tags , , , , on 14 October 2013 by Richard Hornbaker

[This post is part of The Accidental Photo Adventure]

Capitol Reef National Park

After a light breakfast in the motel lobby, we’re back on the road.  Capitol Reef kept coming up as a notable place to visit, so we mapped a route through it on the way to Canyonlands.  It’d only cost us about 90 minutes, plus we’d started to wonder how many national parks we could hit in one road trip.

Near the entrance, it wasn’t obvious how Capitol Reef got its name, but we were fascinated by the contrast in rocks.  A deep red base topped by very white boulders.

DDD_2369

DDD_2366

The red soil was odd, like slate or shale – thin, brittle layers:

DDD_2368

Past the visitor’s center, the scene starts to explain the name – here’s Capitol Rock:

DDD_2558

A bit further, and the “Reef” part of the name starts to make sense – the canyon walls look like Swiss cheese.

DDD_2561

DDD_2567

DDD_2574

Canyonlands National Park

We reached Canyonlands later in the day, and sunset was approaching by the time we reached the furthest observation point.  There were several observation areas along the way, but I think the point at the end of the road gave the best view by far.

An easy half-mile hike from the main viewing platform was a less obstructed view with a nice panorama of the valley below, and the canyons beneath.  It was about an hour before dusk, and the shadows were starting to grow longer (and also add some depth to the landscape). I doubt this vantage point would be good at sunrise; not only would you be shooting toward the sun, but a lot of the shadows would fall where you couldn’t see them.

DDD_2799-Pano

We were staying in nearby Moab for the night, and Arches National Park was just outside town.  By the time we reached town, it was dark and we were hungry.  After dinner, we toyed with the idea of popping into Arches, but then decided against it since we wouldn’t be able to see much anyway.  Besides, the politicians weren’t going to let the US federal budget expire and shutdown the federal government overnight, right?  Surely, they’d reach a compromise at the last minute…

.

Intro | Day 1: Getting Started, Zion | Day 2: Zion
Day 3: Red Canyon, Bryce Canyon | Day 4: Capitol Reef, Canyonlands
Day 5: Dead Horse Point | Day 6: Monument ValleyDay 7: Grand Mesa
Day 8: McClure Pass, Aspen, Garden of the Gods | Day 9: Wolf Creek Pass
Day 10: Durango & Silverton Railroad, Albuquerque Balloon Festival
Day 11: Pre-dawn Balloon Launch, The End | Trip Prep | The Gear
FotoMomenti – My Comrade’s Portfolio

.

Day 3 – Red Canyon, Bryce Canyon

Posted in Photography, Travel with tags , , , , , on 12 October 2013 by Richard Hornbaker

[This post is part of The Accidental Photo Adventure]

Leaving Zion National Park

We slept in a little, then hit the visitor’s center on our way out. Our route was back out the North-East entrance of the park, through Kanab, Utah. Clouds had rolled in, so we stopped strategically to take a handful of retakes, killing about an hour along the way. What a difference it made to have clouds in the sky!

DDD_1907-Pano

This is looking in the opposite direction, toward the tunnel entrance:

DDD_1934-Pano

Red Canyon

Along the route from Zion to Bryce Canyon is Red Canyon, part of Dixie National Forest. It’s a small place, but colorful. Red Canyon’s soil is a dark red like Sedona, AZ, which makes for a very picturesque contrast with the green foliage and blue skies – especially if it’s lightly cloudy.

DDD_1949

Just inside the entrance to Red Canyon is a feature with short trails to photo vantage points and great panoramic vistas.

DDD_1948

DDD_1950

Bryce Canyon National Park

We arrived at Bryce Canyon around 2:00, stopped by the visitor’s center for some guidance and souvenirs, then went straight out to start shooting. We worked our way down all of the observation points and trails, managing to hit the last one well before sunset. But where it had been around 70 degrees in Zion, it was closer to 40 in Bryce – when the sun was behind the clouds, I really felt it!

The weather was lightly cloudy, transitioning to mostly cloudy as the day wore on; at times we’d lose our light, but within a few minutes we’d have a handful of seconds to shoot with hard light. So, it took some observation, patience, and preparedness to get the shots in. There was still enough light to shoot when the sun was behind clouds, but the light became so soft that a lot of the definition in the rocks was lost.

Here’s a view into one area of the Bryce Amphitheater and its army of “hoodoo”, or stone towers.  There were hints of the hoodoo in Red Canyon, but they’re super-concentrated here in Bryce Canyon.

DDD_2059

Bryce Canyon has several viewing areas, with various angles on the amphitheater and surrounding valleys.  It also has several hiking trails that take you down amongst the hoodoo, but then you can’t see the forest for the trees.

DDD_2211-Pano

I have another 7-shot panorama of the hoodoo that my different panorama stitching programs are having a devil of a time with.  My guess is the patterns in the hoodoo are too similar, and the software can’t align the shots.  That’s going to take some manual intervention in PTgui to map the alignment points.  (I’m not sure you can do that in Photoshop.)  Here was Photoshop’s attempt, aborted after several minutes of full CPU:
DDD_2115-Pano-Fail

At the end of the day we checked into Bryce Canyon Inn, a little motel with individual cabins. It was quite a pleasant surprise! For under $100 a night, the accommodations were very nice, with excellent woodwork – wood walls, exposed rafters, nicely constructed and furnished.  (You can tell I’m a woodworker.)

IMG_1281

Because we hit all the points in Bryce so quickly, and the conditions were so ideal, we decided to cut a day off our schedule and head to Canyonlands / Arches day early. The motel was very accommodating, and we were able to move our reservation up in Moab as well. Depending on how much time we need in Arches and Canyonlands, we thought we might make it to Glacier National Park in Montana as well. Little did we realize…

.

Intro | Day 1: Getting Started, Zion | Day 2: Zion
Day 3: Red Canyon, Bryce Canyon | Day 4: Capitol Reef, Canyonlands
Day 5: Dead Horse Point | Day 6: Monument ValleyDay 7: Grand Mesa
Day 8: McClure Pass, Aspen, Garden of the Gods | Day 9: Wolf Creek Pass
Day 10: Durango & Silverton Railroad, Albuquerque Balloon Festival
Day 11: Pre-dawn Balloon Launch, The End | Trip Prep | The Gear
FotoMomenti – My Comrade’s Portfolio

.

Day 2 – Zion National Park

Posted in Photography, Travel with tags , , , , , , on 12 October 2013 by Richard Hornbaker

[This post is part of The Accidental Photo Adventure]

The next morning our plan was to follow the sun.  The North-East end of the park would get the earliest light, while the South end would get the last light of the day.

Our first stop was about 45 minutes before dawn, near a hill called Checkerboard Mesa.  This hill and an adjacent cliff would be the first point of interest to be lit by the sunrise.  There was an observation area with parking, but as typical you couldn’t see the whole panorama from one point without trees obscuring the view.  Solution: get to higher ground.

DDD_1610-Pano

Across from the observation area was a small hill that had been carved out for the road.  That gained about 30 feet of elevation so we were now looking over the tops of the trees.  In the uncropped version of the panorama (see below), you can see how the elevation made a difference compared to the parking lot below.

It was a brisk 27 degrees as we started our setup, with a breeze and no sun.  I’d remembered a heavy coat and hat, but managed to leave my gloves in the hotel; the sun couldn’t come up fast enough!

For the image above, I shot with a 24-70mm at about 30mm.  I used the same 6″x7″ GND filters I’d bought for the wide-angle lens, adding an adapter to attach it to the 77mm filter ring on this lens.  However, what I didn’t think through is the fact that on a longer lens a much smaller section of the filter would be used, making the soft edge of the GND much softer.  Plus the design of Lee’s adapter is a little odd – it’s well made, but designed to pop off the lens a little too easily.

This is a a shot of the Checkerboard Mesa from later in the day, and you can better see the unusual cross-hatch texture that gives it its name.  Truth be told, I probably should have shot the panorama image above a little later to expose this detail, but in my mind’s eye it wasn’t the main subject of the panorama so I didn’t give it as much consideration as I should have.

IMG_1248

Further into the park was a small tunnel that I was able to shoot during a short break in the traffic.

DDD_1666
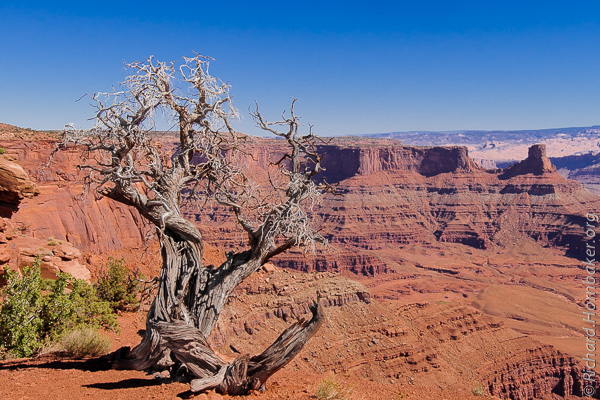
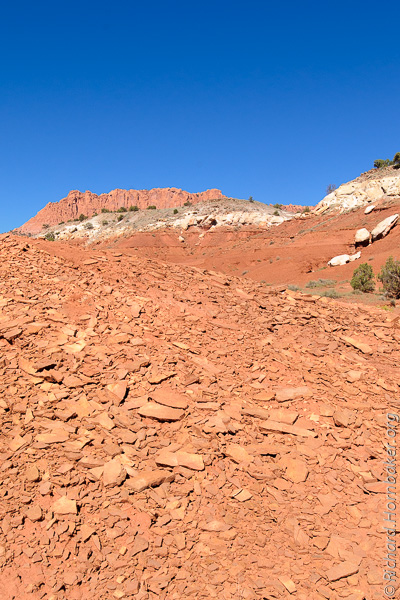
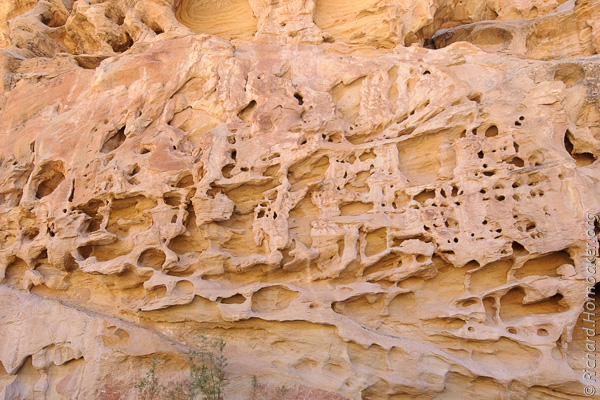
And some really interesting patterns in the stone.  I shot this one thinking it might make an interesting abstract, or desktop wallpaper.  A little later in the day would have yielded a bit more definition via shadows.

DDD_1689

Further in, we came across some wildlife grazing.

DDD_1703

In the center of the park, just outside the long tunnel is a wide panorama (the tunnel is behind me here).

DDD_1731-Pano

Next, we hiked to an area known as the Narrows, an upper section of the Virgin River where the cliffs are vertical and, well, narrow.  This Northern area of the main park is only accessible by shuttle, which runs about every 5 minutes. The hike from the shuttle stop is about a mile along a paved path.

These photos were part of an experiment. (That’s my story, and I’m sticking to it.) The photo on the left was taken without filters.  The one on the right was a test with two filters. One filter was a 0.6 (2-stop) hard-edge GND diagonally lined up with the shadow line on the left, to make the right side of the image darker, allowing the overall exposure to be increased to expose the shadows on the left.

DDD_1739 DDD_1742

The other filter was a Hitech-Formatt 10-stop neutral-density filter.  It did what it should by extending the exposure time 1000x, turning a 1/30-second image into a 30-second image, which blurs the flowing water.  However, the filter also adds a strong color cast that’s proven difficult to correct.  It also has a real issue with even the smallest of reflections in the lens.  That filter’s going to take a bit more work to be useful.

At the end of the day, we camped out early to capture the sunset.  Our vantage point was a bridge at the South end of the park, with an exciting wrinkle – the bridge was plenty wide, but had no sidewalk.  We had to stay close to the edge and watch our backs; buses came pretty close more than a couple times.

DDD_1860-Pano

I intended a few things for this pano that didn’t quite come off – first, I shot it for HDR, but I didn’t like the results (so what you see here is from 6 single exposures).  Second, I was hoping for more of an orange glow – this didn’t happen until the last 10 minutes of sunset, when the shadows had swallowed everything except the far peak.  And third, I’d composed for a taller shot to capture more of the stream in the foreground, but had to crop it out because there was too much clutter on the sides (e.g., capturing the edge of the bridge, people standing, parked cars, etc.); this was due to shooting from the bridge.

Some Thoughts on on Shooting Panoramas

For a bit of technical discussion, here’s the uncropped version of the image above, which gives a better idea of how the shots were taken. This panorama is comprised of 14 images, and then cropped to a 6:1 ratio (which is 4x wider than a typical photo).  That’s a pretty skinny panorama; usually I strive for a 3:1 ratio.

DDD_1610-Pano-BTSSomething that’s not obvious is that these images were all shot in portrait orientation – i.e., camera vertical.  This takes a lot more shots to compose the final image, but it leaves you with many more pixels for a large print.  This final image is 20,000 pixels wide, which means it could be printed 7 feet wide at 240 pixels per inch – you could put your nose on the print and still not see pixels.  However, it does make for big files – this one’s over 300MB.

On a technical note, you can see that my tripod wasn’t very level, judging by the curved edges of the stitched image – that’s a good way to cripple your cropping options on a panorama; I got lucky this time because the subject was particularly wide. The hairlines you see in the image show where Photoshop selected from different frames to stitch the image together. (Normally I use a product called PTgui to stitch my panoramas, but I’m giving Photoshop CS5.5 a try for this trip.)

A few comments on my technique for panoramas… Focus is set on the main subject using spot-focus, then switched to manual.  Exposure is always Manual mode; the aperture is fixed at f/11 or f/16 for most of the shots on this trip for deeper depth of field, and shutter speed is adjusted to control the exposure.  ISO is set to the native value for my camera (ISO200).  I also have the camera set for 14-bit capture (instead of 12-bit), which yields a little more dynamic range.

No HDR bracketing was done for this image – just one shot per frame.  Exposure was set so the brightest point in the frame (the cliff face) was just barely warning about blown highlights in my camera’s LCD preview – this yields the most detail form the shadows without losing the highlight detail.

When I shoot for panoramas, I overlap each shot by 50%, which gives the software the most material to correct lens distortion; I also always shoot an extra frame on each end for the same reason.  I don’t use a panorama head on my camera, so objects in the foreground do get distorted, and when composing an image I need to plan for that cropping.  (If you search on the keywords “entrance pupil”, you’ll find explanations for this.)

And Some Thoughts on Printing Panoramas

The challenge with printing panoramas is that many shops don’t offer the shape you need, or they charge a premium. My solution is to layout multiples of the same panorama in a single file, then trim them to size myself.  Your local FedEx Office (Kinko’s) has roller cutters in their public area that can trim up to 48″ sheets.

DDD_1610-Pano PrintHere are the steps I use in Photoshop:

  • Open the image
  • Image | Image Size | 24 inches @ 300 pixels/inch – for a final image that’s 24″ wide
  • Add copyright text
  • Right-click on the Background layer and select Layer from Background – this keeps the layer from resizing when the canvas is resized
  • Layer | Merge Layers – to combine the text and photo
  • Image | Canvas Size – set this to the actual dimensions of the print paper
  • Duplicate the image layer, and drag the copy downward while holding the shift key to keep them aligned
  • Add 2-pixel hash marks with the pencil tool, to make the end cuts easy to align
  • Image | Mode | 8 bits/channel – to support the JPEG file format.
  • Edit | Convert to Profile | sRGB – all printers will work with sRGB; if I have a printer-specific ICC profile, I’d select it here instead.
  • File | Save as in JPEG at the highest quality setting

The reason this photo doesn’t go edge-to-edge on the print above… the large-format printer I use has a 1/4″ white border around the sheet, and I want my image printed to the edge without having to trim the 1/4″ edge and yielding an odd-sized print. So, instead of printing three 5″x30″ images on a print, I’ll do four 4″x24″ images.

And a finishing touch… when trimming the prints, they get handled a lot; I wear gloves to keep fingerprints off the photo.  Latex would probably work, but I use cheap cotton inspection gloves from Grainger.

Oops!

And just to show that things don’t always work smoothly, here’s Photoshop’s attempt at stitching a 6-frame panorama that had been processed through a trial copy of Photomatix first.  Although the same HDR settings were used on all the images, there was apparently a lot of difficulty in auto-aligning them – this looks like something from the Star Trek episode where the transporter was malfunctioning.

DDD_1858-HDR-FailI’m a slow adopter of HDR, and this was a trial at doing both HDR and panorama stitching by first processing the images in HDR and then stitching them.  PTgui does both at once, but I don’t like the look of its HDR; I have Nik’s HDR Efex Pro 2 as part of the Nik Collection, but at least their presets disagree with my tastes as well.  So far, I’m liking the look of a couple Photomatix presets (e.g., Smooth 2), but I clearly have some kinks to work out.

.

Intro | Day 1: Getting Started, Zion | Day 2: Zion
Day 3: Red Canyon, Bryce Canyon | Day 4: Capitol Reef, Canyonlands
Day 5: Dead Horse Point | Day 6: Monument ValleyDay 7: Grand Mesa
Day 8: McClure Pass, Aspen, Garden of the Gods | Day 9: Wolf Creek Pass
Day 10: Durango & Silverton Railroad, Albuquerque Balloon Festival
Day 11: Pre-dawn Balloon Launch, The End | Trip Prep | The Gear
FotoMomenti – My Comrade’s Portfolio

.